Showing posts with label clothing. Show all posts

Monday, December 20, 2010

Holiday Beat Down and Mushroom Scarf Progress

Is this holiday season kicking anyone else's butt? Because I lost another week and have no idea where it went. At least I'm not alone. It's been crazy for just about everyone, I think. 'Tis the season, right?

I'm wrapping up all sorts of projects, but since the projects I'm working on right now are gifts and I'm pretty sure that some of the recipients read this blog, I can't share any pictures. Lame. But, with that said, don't leave just yet, friends!

You see, I have a sanity project* that I'm working on for myself that is coming to a close, so this isn't going to be a completely picture-less post! The project is full of mushroomy goodness and it's definitely one of my favorite projects so far. Hopefully you like it, too.

The mushroom scarf! 

Here it is (with a nice helping of me trying my hand at a teaser picture for my Twitter feed):
Sidenote: The picture seems kind of run-of-the mill as WIP teasers go, though. Going to have to work on that!

The mushrooms are all made and put together. Now it's time for the spots. I'm aiming for a double sided scarf so I'm doing a lot of sewing between the stitches right now. The method is great for hiding stitches, but not so good if you're in a hurry. And since this is a sanity project instead of a working project, it's not a priority right now. Even if I'm super excited to see the finished project, there are holiday gifts and other things that need doing now!!

Update: Here's a better picture

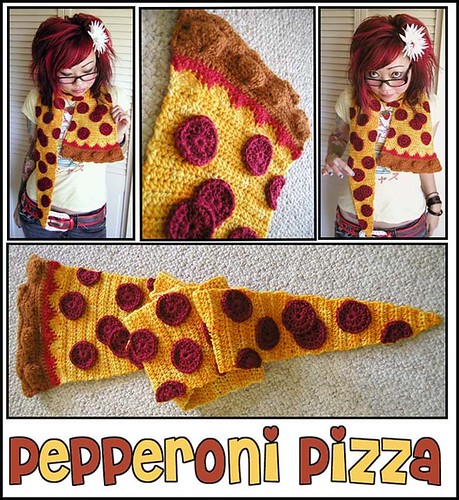
I got the idea for this scarf from TwinkieChan. She crochets all sorts of food related things and is well-known for her cupcake scarfs. They are totally cute but I'm not a cupcake kind of person, so I made one that's more my style. With that said, I think my favorite scarf that I've seen from her is the pepperoni pizza slice. Talk about super creative!! If you have a chance, I recommend that you check out her blog and shop for all sorts of cool food related stuff. And (as though that isn't enough!), if you're up to making some of her food themed ideas, she has a book of patterns out, too! I'm hoping that Santa brings me a copy!! *hint, hint, Santa*

What have you all been making in your free time?


*Sanity project: A mini-project (or not) to work on when the main project is pissing you off or otherwise bores/annoys you. Usually for fun, silliness, and yourself. 

I use these projects as a release for when I'm feeling burned out on a project or crocheting in general.

Sunday, March 21, 2010

Freezer Paper Stencils

I tried out freezer paper stencils this weekend. I love designing clothes for my kiddos and this little project was a lot of fun.

I made a couple of mushrooms and I think that they turned out nicely.

And it was super simple! The hardest thing to do with this project was wait for the paint to dry.

Close-up of my finished shirt design

Freezer paper is great for many reasons. It is readily available at any of the larger grocery stores and you can cut it to any shape your heart desires. In application, when the plastic coating on the freezer paper is ironed, it makes a nice seal to fabric and doesn't leave a residue after you peel it off. And you don't just have to use it with paint either--I used it on a bleach distressed shirt and it also worked like a charm. This stuff is magic!

Supplies Required:
  • Fabric (I made T-shirts this time around)
  • Freezer paper
  • Scissors and xacto knife
  • Iron (with the steam function turned off)
  • Permanent fabric paint
  • Paint brush, foam brush, and/or squeegee
  • A flat place to dry your stuff

Here are the super simple steps for applying a design using freezer paper:
  1. Draw design on the freezer paper.
  2. Cut out the parts of the design that you want to print using scissors and/or an xacto knife. NOTE: Cut in the paper = Color on the fabric: The freezer paper is the guide to where the paint will end up. If you make an accidental cut in the paper, either plan for paint to show through there or start over from scratch.
  3. Iron freezer paper to fabric.
  4. Squeeze paint onto open section of stencil and use a paint brush, foam brush, or squeege to cover the hole in the stencil and paint the fabric. Using the brushes/squeege will cause the paint to lay more evenly on the fabric than if you were to just squirt it on.
  5. Allow paint to dry completely.
  6. Peel off the stencil and admire the product of your not-too-hard work.
  7. Repeat steps 1-5 for additional colors.
  8. Iron the paint for 20-30 seconds to set it to the fabric.
  9. Allow to stand for 72 hours before washing the fabric inside out.
It is easiest to work the color on multi-color projects in layers starting with the lightest color paint when you want multiple colors on a project.

For instance, on the mushrooms, I wanted a white background so I used the white first, then added the color to the cap second. I had it easy because all my color was going to the same place.

If you are doing a multi-color project where the colors appear on different areas of the stencil, then you could potentially do all of the painting at one time while being mindful of not mixing the colors or going into areas that you want other colors to be. That would certainly make the drying time for the project less because you wouldn't have to wait for layers of paint to dry before adding more.

I have read that you can use up to 5 layers with success, but I only tried the 2 so I can't give you any real life feedback on that. Perhaps in the future I will be able to, though. This was fun so I have plans for more freezer paper stencil projects.

I made these in about 2 hours, with only about 30 minutes of that spent actively working. The rest of the time was spent drying.

My inspiration for this project came from:
Made - In this post, Dana made super cute toddle pants with Goldfish stencils.
Craftster Forum - A place where tons of really creative people have made all sorts of things and then posted pictures and wrote about them.
Neither Hip Nor Funky - I used this post to check myself during the actual process.

If I made these in my free time, you could crafts some serious works of art in yours!

Try it out sometime!