Hi! How've you been? I've been....up to stuff. Stuff that I had a lot of fun making. And stuff that I will be sharing throughout the course of this weekend and next week!
For instance, stuff like finishing the mushroom scarf.
And playing outside
while wearing the mushroom scarf.
I have big plans for 2011 and the list is growing all the time. Which reminds me--I really do need to sit down and write the list down before I forget it...
Stay tuned for more posts and projects in 2011. More frequency, more fun, and more ninjas and mushrooms! This is one of the things on my list. What's on yours?
Showing posts with label crochet. Show all posts
Thursday, January 13, 2011
Monday, December 20, 2010
Holiday Beat Down and Mushroom Scarf Progress
Is this holiday season kicking anyone else's butt? Because I lost another week and have no idea where it went. At least I'm not alone. It's been crazy for just about everyone, I think. 'Tis the season, right?
I'm wrapping up all sorts of projects, but since the projects I'm working on right now are gifts and I'm pretty sure that some of the recipients read this blog, I can't share any pictures. Lame. But, with that said, don't leave just yet, friends!
You see, I have a sanity project* that I'm working on for myself that is coming to a close, so this isn't going to be a completely picture-less post! The project is full of mushroomy goodness and it's definitely one of my favorite projects so far. Hopefully you like it, too.
The mushroom scarf!
Here it is (with a nice helping of me trying my hand at a teaser picture for my Twitter feed):
Sidenote: The picture seems kind of run-of-the mill as WIP teasers go, though. Going to have to work on that!
The mushrooms are all made and put together. Now it's time for the spots. I'm aiming for a double sided scarf so I'm doing a lot of sewing between the stitches right now. The method is great for hiding stitches, but not so good if you're in a hurry. And since this is a sanity project instead of a working project, it's not a priority right now. Even if I'm super excited to see the finished project, there are holiday gifts and other things that need doing now!!
Update: Here's a better picture
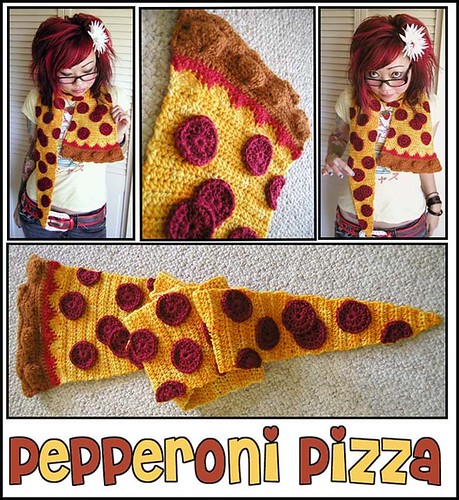
I got the idea for this scarf from TwinkieChan. She crochets all sorts of food related things and is well-known for her cupcake scarfs. They are totally cute but I'm not a cupcake kind of person, so I made one that's more my style. With that said, I think my favorite scarf that I've seen from her is the pepperoni pizza slice. Talk about super creative!! If you have a chance, I recommend that you check out her blog and shop for all sorts of cool food related stuff. And (as though that isn't enough!), if you're up to making some of her food themed ideas, she has a book of patterns out, too! I'm hoping that Santa brings me a copy!! *hint, hint, Santa*
What have you all been making in your free time?
*Sanity project: A mini-project (or not) to work on when the main project is pissing you off or otherwise bores/annoys you. Usually for fun, silliness, and yourself.
I use these projects as a release for when I'm feeling burned out on a project or crocheting in general.
Monday, December 13, 2010
Things that start with the letter P
The theme of today's blog is: Things That Start With the Letter P
And I haven't even been watching a lot of Sesame Street lately. :) Just a strange theme of my life lately.
Let's begin...
And I haven't even been watching a lot of Sesame Street lately. :) Just a strange theme of my life lately.
Let's begin...
Patches
The boy is rough on his clothes. He's 2 years old and wears holes in the knees of his jeans like they're made of paper. The jeans are perfectly good otherwise, so I wasn't willing to throw them away. Not with a perfectly good stash of fabric to use for patches!
So, Bubba and I raided the fabric stash and he came out with a totally awesome new look for his previously holey jeaned self:
And I came out with 4 hours less of my life (who knew patches took so long to sew on pants!?!) and a couple of holes in my fingers. But he loves them so I think it's totally worth it.
Puckerooms
Mushroom shaped candy. Apparently they're even sort of good for you what with being made with natural ingredients and 25% real fruit juice and all...
Why have I not heard of these before!?! These bad boys are right up my alley. My dentist will be rich!
Purse Pick-Me-Up
My sister gave me a lovely purse for my birthday. She's the purse queen and takes her purses very seriously. So imagine her heartbreak when she realized the zipper on it was off center after I had torn open the wrapping paper on the big day.
I, on the other hand, was perfectly happy. It was a sweet gesture and I had a fabulous idea to make the purse look like there was no defect at all. My sister was skeptical, but she has faith in my crafty abilities.
Here's what I came up with:
I, on the other hand, was perfectly happy. It was a sweet gesture and I had a fabulous idea to make the purse look like there was no defect at all. My sister was skeptical, but she has faith in my crafty abilities.
Here's what I came up with:
I'm working on a small mushroom and some flowers, too. That way I can switch them out when I feel like something a little bit different. Thanks, sis!
So those are a few projects that I've made in my free time lately. What have you all been up to?
Thursday, December 9, 2010
Brr...Scarf weather and how to make a crochet pattern map
For those of you that don't know me personally:
I live in Alaska.
Have you ever been to Alaska? You really should visit.
In the summer.
Don't come now. You'll freeze before you even step off of the plane.
As I type this, the temperature is sitting at a nice cozy -27 degrees F. That's -33 degrees C, in case you were wondering and didn't want to do math.
It is this time of year that I wonder to myself, "WHY?"
But the silver lining to this frozen ice cloud is that this just lasts for a few weeks at a time. And if you really want to put things in perspective, we haven't even hit our cold snap yet. That comes in the end of January.
Seems kind of needless to say this now, but I will any way:
This is perfect scarf weather.
Well, as long as the scarf isn't the only thing you're wearing, that is.
Here's my scarf:
It's a prototype of one of my many ninja related ideas. I call it a prototype because I always make up a project like this and then fiddle with it until I like the end result.
My method for mapping out a pattern just takes an idea, some graph paper (or blank paper and a ruler), and a pen or pencil.
For instance, take my scarf. I made the ninja heads first and then made the rest. My stitch pattern map for the ninja heads looks like this:
Except I did mine by hand so it's a lot messier! I also used a different count--the numbers are there for show and not function. This pattern map would make a very small ninja.
I used a simple single crochet stitch and took it row by row working the ends in as I went. Remember, your pattern map is written in pen or pencil--not stone. You can change it up as you go based on how the piece is taking shape.
Once the whole thing was done, I single crocheted around the outside to give the piece a clean, round look. And since I worked the ends into the back of the piece, it made the scarf single sided.
Okay, I had no idea what a pain in the ass a single sided scarf can be until I wore this one around for a little while. I am constantly turning the faces so they are right side out. I'd much rather make the pattern double sided to avoid that altogether! My solutions so far have left tons of loose ends to work in later on, so I'm still in the figure it out stage of things with the pattern.
Stop back by and share what you've made in your free time. I'd love to see!
Happy pattern mapping!!
Stop back by and share what you've made in your free time. I'd love to see!
Tuesday, November 30, 2010
Is there a little ninja in ya?
Yesterday, I sold some ninja heads.
It felt pretty good.
I think I want to do it again. So I'm making more.
And!
I'm working on starting up an etsy shop. More to come when I have that information.
I have some folks who have already put in requests for ninjas, so those guys come first. After that, I'm going to just keep crocheting (crocheting, crocheting, just keep crocheting) and crank out some heads for the shop.
Soon, there will be ninja heads for all!
Monday, November 29, 2010
Sunday, May 9, 2010
Happy Mother's Day!
I have been saving these for Mother's Day so the surprise wouldn't be ruined.
This year was a homemade kind of holiday.
Here are the presents before I wrapped them up:
And since my sister's birthday is May 10th, I brought presents that I made for her, too!
Everyone was very happy with their gifts. Surprisingly happy, if you ask me.
Is anyone else ever surprised at the appreciation your family shows about receiving your handmade gifts? I don't know why, but I always doubt my presents until the recipient actually opens them. It's weird. I love getting handmade gifts so why wouldn't I expect others to love getting mine? I don't know, but it makes for some sweaty palms until the gifts are opened! That's for sure.
How did you show your mother how much you love her?
This year was a homemade kind of holiday.
Here are the presents before I wrapped them up:
My mother got her ninjas
(and a picture frame like my grandmother's below)
My grandmother got a picture frame with a picture of the kids and some of the batik fabric that they painted and a necklace with their names in shrink-a-dink.
Sorry no pictures of the necklace--I made it about an hour before we left for lunch on Sunday.
And since my sister's birthday is May 10th, I brought presents that I made for her, too!
Mushroom in her favorite color: purple
Credit card case made out of the tester batik fabric
(the other one is for me)
Everyone was very happy with their gifts. Surprisingly happy, if you ask me.
Is anyone else ever surprised at the appreciation your family shows about receiving your handmade gifts? I don't know why, but I always doubt my presents until the recipient actually opens them. It's weird. I love getting handmade gifts so why wouldn't I expect others to love getting mine? I don't know, but it makes for some sweaty palms until the gifts are opened! That's for sure.
How did you show your mother how much you love her?
Friday, May 7, 2010
More babies? More mushrooms.
There were a pair of babies born into our circle of friends and another friend's child turned 2 years old in the last couple of weeks. So I went to my go-to young child design and personal favorite: The mushroom.
Have you made anything fun lately?
Wednesday, May 5, 2010
Bob Marley Mushrooms!!
Late on Sunday night, it seemed like a cool idea to crochet a rainbow patterned mushroom.
Then it seemed like a good idea to make a reversed rainbow patterned mushroom.
So I did. (Yay for insomnia?)
I didn't realize that they remind me of Bob Marley until the next morning. Especially the reverse rainbow patterned one pictured on the right.
And with all that color, they're perfect for a post on Cinco de Mayo!! Don't you agree? :)
Then it seemed like a good idea to make a reversed rainbow patterned mushroom.
So I did. (Yay for insomnia?)
I didn't realize that they remind me of Bob Marley until the next morning. Especially the reverse rainbow patterned one pictured on the right.
And with all that color, they're perfect for a post on Cinco de Mayo!! Don't you agree? :)
Tuesday, April 13, 2010
We all have to start somewhere
Last night, I was looking at my very neglected Myspace account and found some buried treasure!
What an awesome find!
Monday, April 5, 2010
More mushrooms and half an octopus
I made 3 little mushrooms for a friend's baby and started an Amigurumi World style octopus for my son this weekend.
When I first started making amigurumi again I made a mushroom for this baby, but I stashed it away instead of mailing it as soon as it was ready. I'm kind of glad I did now because a month later after MANY mushrooms made, I would be embarrassed to send it now.
For a beginner, it's not too bad. The stitches are loose and I hadn't quite perfected the pattern or art of the color change yet, so it's just a mess by my standards today.
What's a crafter to do?
Why, make 3 more mushrooms to replace it, of course!

I'm quite pleased with how they came out. I got to play around with some of my bright colored yarns some more which is always fun. And I decided to do a sort of counting theme with the spots on the mushrooms. So you will notice each mushroom has a different number of spots for counting and are different colors for color identification.
The baby's only 3 months old, but we're starting her early. :)
What have you made in your free time?
When I first started making amigurumi again I made a mushroom for this baby, but I stashed it away instead of mailing it as soon as it was ready. I'm kind of glad I did now because a month later after MANY mushrooms made, I would be embarrassed to send it now.
For a beginner, it's not too bad. The stitches are loose and I hadn't quite perfected the pattern or art of the color change yet, so it's just a mess by my standards today.
What's a crafter to do?
Why, make 3 more mushrooms to replace it, of course!

I'm quite pleased with how they came out. I got to play around with some of my bright colored yarns some more which is always fun. And I decided to do a sort of counting theme with the spots on the mushrooms. So you will notice each mushroom has a different number of spots for counting and are different colors for color identification.
The baby's only 3 months old, but we're starting her early. :)
What have you made in your free time?
Friday, April 2, 2010
Project Completion - Crochet

I finally finished the mushroom bag!!
<--Head banger mushroom here is supposed to represent how happy I am right now.
Actually, the whole family is pretty excited and that even includes my husband. I'm excited because it's done and pretty much what I thought it would look like. My kids are excited because it's for them. And my husband's excited because he thought it was "a cool idea." And because I was so excited about this last night that I took pictures so I could share the completed project with you.
With that I present to you--in all of it's glory--the mushroom bag!!
This is the bag all closed up:
Wednesday, March 31, 2010
Two mushrooms and a bracelet
Since I bought some new colors of yarn recently, I decided to make a couple of funky colored mushrooms.
I know, I know. I finally got my crochet hook back so I should be working on the mushroom bag. Well, I am. But I get bored of working on the same thing for hours and hours on end. Especially when the stitch I'm using is not the most exciting...
So when I get bored while working on one of my bigger projects, I make a small mushroom. They only take about an hour from start to finish which makes for a nice, quick gratifying project. It's almost like it resets my mindset to keep the boredom at bay.
As long as it helps me to complete the big projects so they don't just sit in the WIP bag forever, I think it's a handy method. We'll call it the distraction technique. As in you are distracting yourself with a small project.
I also made a bracelet using some prefabricated stuff I picked up from the craft store. But I couldn't pass up the snake clasp and with my love for snakes I had to throw a heart on there, too.
It's nice and light and goes well with the new necklace that I bought from Lisa Leonard Designs. For those of you that haven't seen Lisa's work, take a look around the website. My necklace is perfect and makes me want to buy more of her stuff. Seriously.
So that's what I've made in my free time recently. What have you made in yours?
I know, I know. I finally got my crochet hook back so I should be working on the mushroom bag. Well, I am. But I get bored of working on the same thing for hours and hours on end. Especially when the stitch I'm using is not the most exciting...
So when I get bored while working on one of my bigger projects, I make a small mushroom. They only take about an hour from start to finish which makes for a nice, quick gratifying project. It's almost like it resets my mindset to keep the boredom at bay.
So that's what I've made in my free time recently. What have you made in yours?
Monday, March 29, 2010
Jelly Bean Bunny Pattern
Just in time for Easter, I bring you the first crochet pattern I have ever published for other people's personal use: the Jelly Bean Bunnies.
If you remember yesterday's post, you will remember that I mentioned it took me from Friday evening to Sunday morning to finish these little cuties. This happened because 1) I was making two of them so the creation time was doubled and 2) these are presents for my kids so I could only work on them while the kids were asleep.
One bunny should really only take about an hour to an hour and a half of continuous work.

Jelly Bean Bunny
Pattern
(Crochet)
Work in the round using an F hook unless otherwise specified.
Body:
1) Chain 2.
2) Single crochet (SC) 6 times into second loop from hook (or first loop in the chain depending on how you look at it).
3) SC twice in each SC around the circle (=12)
4) SC in each SC around the circle (12)
5) SC one, then SC twice into the next SC. Repeat 6 times to complete the circle. (18)
6) SC 18 for 6 rows (18)
7) SC one, then decrease (DEC) one. Repeat 6 times. (12)
8) Turn the body right side out.
9) SC 12 (12)
10) DEC around the circle (6)
11) Tie off and resist the urge to stuff the body. You can, but things are a whole lot easier if you wait.
Ears (make 2):
Using an E hook, work across.
1) Chain 3.
2) SC in second loop from hook and SC remaining loop on the chain. (2)
3) SC 2 for 4 rows. (2)
4) SC twice in each SC across. (4)
5) SC 4 for 2 rows. (4)
6) DEC across the row. (2)
7) Tie off leaving a long end for tightening up the edge.
8) Using a children's needle (you know, those thick light blue plastic ones that are perfect for yarn), tighten up the edge of the ears by working in the long end along the stitches on the very outside of the ear shape. Once you've sewed all the way around, pull the long end and tighten it to a nice, neat ear shape. If you don't have a long enough end to attach the ear to the head, cut yourself a short piece of yarn and tie the ear on with that.
Head:
1) Chain 2.
2) SC 6 into second loop from hook (or first loop in the chain depending on how you look at it).
3) SC twice in each SC around the circle (=12)
4) SC one, then SC twice into the next SC. Repeat 6 times to complete the circle. (18)
5) SC 18 for 6 rows (18)
6) SC one, SC one, SC twice into the next SC. Repeat 6 times. (24)
7) SC 24 for 3 rows (24)
8) SC one, SC one, DEC one. Repeat 6 times. (18)
9) SC 18 (18)
10) Turn the head right side out.
11) Attach ears and embroider the face before completing the head.
12) SC one, DEC one. Repeat 6 times. (12)
13) DEC around the circle. (6)
14) Tie off and stuff the head.
Arms and Legs (make 2 of each):
Using an E hook, work in the round.
1) Chain 2.
2) SC 6 into second loop from hook (or first loop in the chain depending on how you look at it).
3) SC one, then SC twice into the next SC. Repeat 6 times to complete the circle. (9)
4) SC 9 for 5 rows (arms) or 6 rows (legs).
5) Tie off leaving long ends for sewing the legs to the body.
6) Stuff the legs if desired. I left mine unstuffed and the bunnies transition quite nicely from sitting to standing. I think that stuffing the arms and legs would make them a little harder to move around, but I could be wrong. Try it out and let me know!
Tail:
Make a small pom-pom and leave long ends for tying to the body.*
*How to make a pom-pom with your finger:
1) Wrap some yarn around your pinky finger close to the fingernail (for bigger pom-poms, use a bigger finger) about 10-12 times. Cut the yarn.
2) Cut another piece of yarn of the same color about 8 inches long.
3) Take the circle of yarn that you just wrapped off of the end of your finger.
4) Wrap the short piece of yarn around the middle of the circle of yarn and tie a knot.
5) Cut the loops on each side of the knot. (Do you see the pom-pom taking shape now?)
6) Trim the edges of the pom-pom until it is the desired size and shape.
7) Roll the pom-pom in your hands to fuzz up the ends of the yarn a little bit.
Assembly:
Attach the arms, legs, and tail to the body. Then stuff the body. Last, attach the head to the top of the body.
And you're done!

I hope you get a chance to try these out. Let me know if you have any questions, concerns, comments, corrections, etc.
Happy crocheting!
One bunny should really only take about an hour to an hour and a half of continuous work.
Pattern
(Crochet)
Body:
1) Chain 2.
2) Single crochet (SC) 6 times into second loop from hook (or first loop in the chain depending on how you look at it).
3) SC twice in each SC around the circle (=12)
4) SC in each SC around the circle (12)
5) SC one, then SC twice into the next SC. Repeat 6 times to complete the circle. (18)
6) SC 18 for 6 rows (18)
7) SC one, then decrease (DEC) one. Repeat 6 times. (12)
8) Turn the body right side out.
9) SC 12 (12)
10) DEC around the circle (6)
11) Tie off and resist the urge to stuff the body. You can, but things are a whole lot easier if you wait.
Ears (make 2):
Using an E hook, work across.
1) Chain 3.
2) SC in second loop from hook and SC remaining loop on the chain. (2)
3) SC 2 for 4 rows. (2)
4) SC twice in each SC across. (4)
5) SC 4 for 2 rows. (4)
6) DEC across the row. (2)
7) Tie off leaving a long end for tightening up the edge.
8) Using a children's needle (you know, those thick light blue plastic ones that are perfect for yarn), tighten up the edge of the ears by working in the long end along the stitches on the very outside of the ear shape. Once you've sewed all the way around, pull the long end and tighten it to a nice, neat ear shape. If you don't have a long enough end to attach the ear to the head, cut yourself a short piece of yarn and tie the ear on with that.
Head:
1) Chain 2.
2) SC 6 into second loop from hook (or first loop in the chain depending on how you look at it).
3) SC twice in each SC around the circle (=12)
4) SC one, then SC twice into the next SC. Repeat 6 times to complete the circle. (18)
5) SC 18 for 6 rows (18)
6) SC one, SC one, SC twice into the next SC. Repeat 6 times. (24)
7) SC 24 for 3 rows (24)
8) SC one, SC one, DEC one. Repeat 6 times. (18)
9) SC 18 (18)
10) Turn the head right side out.
11) Attach ears and embroider the face before completing the head.
12) SC one, DEC one. Repeat 6 times. (12)
13) DEC around the circle. (6)
14) Tie off and stuff the head.
Arms and Legs (make 2 of each):
Using an E hook, work in the round.
1) Chain 2.
2) SC 6 into second loop from hook (or first loop in the chain depending on how you look at it).
3) SC one, then SC twice into the next SC. Repeat 6 times to complete the circle. (9)
4) SC 9 for 5 rows (arms) or 6 rows (legs).
5) Tie off leaving long ends for sewing the legs to the body.
6) Stuff the legs if desired. I left mine unstuffed and the bunnies transition quite nicely from sitting to standing. I think that stuffing the arms and legs would make them a little harder to move around, but I could be wrong. Try it out and let me know!
Tail:
Make a small pom-pom and leave long ends for tying to the body.*
*How to make a pom-pom with your finger:
1) Wrap some yarn around your pinky finger close to the fingernail (for bigger pom-poms, use a bigger finger) about 10-12 times. Cut the yarn.
2) Cut another piece of yarn of the same color about 8 inches long.
3) Take the circle of yarn that you just wrapped off of the end of your finger.
4) Wrap the short piece of yarn around the middle of the circle of yarn and tie a knot.
5) Cut the loops on each side of the knot. (Do you see the pom-pom taking shape now?)
6) Trim the edges of the pom-pom until it is the desired size and shape.
7) Roll the pom-pom in your hands to fuzz up the ends of the yarn a little bit.
Assembly:
Attach the arms, legs, and tail to the body. Then stuff the body. Last, attach the head to the top of the body.
And you're done!
I hope you get a chance to try these out. Let me know if you have any questions, concerns, comments, corrections, etc.
Happy crocheting!
Sunday, March 28, 2010
It's been a crochet kind of weekend
I've been crocheting like a mad woman this weekend!
It all started early on Friday night when my husband rescued my F sized crochet hook from our evil couch. Overjoyed at our reunion, I got the bright idea to make a pair of amigurumi bunnies for the kids for Easter. One for the boy and one for the girl.
Considering my children are both under 4 years old, their toys generally get dirty pretty quickly. Because of that, white bunnies were out and I wasn't really too keen on the idea of making brown bunnies. So that led to the creation of our bright yellow Jelly Bean Bunnies! Come back on Monday evening when I will post a pattern for the Jelly Bean Bunnies.
By the end of naptime on Saturday I had made enough bunny body parts for two bunnies and by this morning, the Jelly Bean Bunnies were completely assembled. The kids are going to be so happy when they see them!
With that project out of the way, I was left with the rest of a perfectly good Sunday for crafting and other miscellaneous family fun.
So a little bit later on while the kids were napping (and their Dad stayed with them), I went to the craft store and bought some supplies to do the kid friendly batiking from That Artist Woman's blog. And after the kids got up from their nap, we completed stage one of the process. Now we wait until tomorrow after work and daycare when we will paint!
Next, I made a mushroom for myself. It's the first one that I've kept and I think it's my favorite so far. Purely by coincidence, but what a happy coincidence it is.
The last project of today was to put some more work into the crocheted mushroom bag. It's substantially bigger than any other mushroom that I have made to date. And I'm not going to stuff it so the shaping of the mushroom is a little bit less forgiving than what I'm used to. But it's taking shape. Slowly. At least it actually looks like a mushroom now instead of a hat. So that's a step in the right direction...
And that's what I have made in my free time this weekend. How about you?
It all started early on Friday night when my husband rescued my F sized crochet hook from our evil couch. Overjoyed at our reunion, I got the bright idea to make a pair of amigurumi bunnies for the kids for Easter. One for the boy and one for the girl.
By the end of naptime on Saturday I had made enough bunny body parts for two bunnies and by this morning, the Jelly Bean Bunnies were completely assembled. The kids are going to be so happy when they see them!
With that project out of the way, I was left with the rest of a perfectly good Sunday for crafting and other miscellaneous family fun.
So a little bit later on while the kids were napping (and their Dad stayed with them), I went to the craft store and bought some supplies to do the kid friendly batiking from That Artist Woman's blog. And after the kids got up from their nap, we completed stage one of the process. Now we wait until tomorrow after work and daycare when we will paint!
Next, I made a mushroom for myself. It's the first one that I've kept and I think it's my favorite so far. Purely by coincidence, but what a happy coincidence it is.
The last project of today was to put some more work into the crocheted mushroom bag. It's substantially bigger than any other mushroom that I have made to date. And I'm not going to stuff it so the shaping of the mushroom is a little bit less forgiving than what I'm used to. But it's taking shape. Slowly. At least it actually looks like a mushroom now instead of a hat. So that's a step in the right direction...
And that's what I have made in my free time this weekend. How about you?
Thursday, March 25, 2010
Oh, woe is me...
I've lost my F sized crochet hook.
Well, actually, I know exactly where it is. My evil couch ate it.
Normally I would not mind because I have plenty of other craft projects to keep me busy until I find it again. But this is not normally!

Right now, as I type this, I am midway through my mushroom bag project from the Work and Ideas in Progress page. I'm really excited about finishing this bag so I can show you! It's going to be so cool (at least I hope so, anyway) but we won't find out if I don't find my hook!!
Oh, woe is me...
Nothing small and crocheted will be made in my free time until my couch gives up that F hook!
It's on, now. This is my house, couch! You will not take my stuff from me!!
What have you made in your free time lately?
Well, actually, I know exactly where it is. My evil couch ate it.
Normally I would not mind because I have plenty of other craft projects to keep me busy until I find it again. But this is not normally!

Right now, as I type this, I am midway through my mushroom bag project from the Work and Ideas in Progress page. I'm really excited about finishing this bag so I can show you! It's going to be so cool (at least I hope so, anyway) but we won't find out if I don't find my hook!!
Oh, woe is me...
Nothing small and crocheted will be made in my free time until my couch gives up that F hook!
It's on, now. This is my house, couch! You will not take my stuff from me!!
What have you made in your free time lately?
Monday, March 15, 2010
The pink elephant and the devil duck
Interested in testing my metal as a free form crocheter, I offered to make some animals for my kids last weekend.
They picked the kind of animal that I made and then I gave them free access to my yarn stash to pick the colors. Let's see if you can tell by what I created:
The duck on the left is for the boy and the elephant on the right is for the girl.
That's right, folks. Flaming red with baby blue accents was the idea of my almost 2 year old son, not me.
Anyhow, the elephant was pretty easy to figure out. The hardest part which wasn't really hard at all, was figuring out how to get the trunk to curve. It's all single crochet with increases and decreases worked in the round.
This project went really fast and I had it completed in a couple of hours.
Then there's the duck...well, let's just say that it has a nickname now: The Devil Duck.

The nickname was created not just because of the color, although it does make the duck look a little bit devilish. No, the nickname came because it took me MANY hours and MANY stitches to figure out this pattern. I'm talking: Crochet a shape, look at shape, decide it's not right, rip the stitches, crochet, look, decide, rip, crochet, and on and on until the duck started to take a duck-like shape. The head was really easy, but the body was certainly not. <--UNDERSTATEMENT OF THE YEAR
Right before I figured it out, I looked from the pile of ripped out yarn to my husband and proclaimed, "This is the last time I'm going to try this. If it doesn't work, the boy is getting a duck head and that's it!"
So I tried one last idea. An idea that if it hadn't worked would have been hell to rip out (see the theme here?). And then, to my utter amazement, the duck's body started to take shape.
In the 2 days that it took me to make the duck, I spent about 8 hours on the dang thing. Sad considering that once the pattern was figured out it took me about an hour and a half to complete.
I can tell you this: I won't be making another duck anytime soon. And when I do, I'm using a pattern.
All that trouble and turmoil and I still managed to pump out 2 crocheted critters in a weekend.
And the best part is that my kids love the animals. To date, they have slept with them every single night. That right there makes all the duck frustration worth it.
As I always say: If I made this in my free time, then imagine what you could do in yours!
They picked the kind of animal that I made and then I gave them free access to my yarn stash to pick the colors. Let's see if you can tell by what I created:
The duck on the left is for the boy and the elephant on the right is for the girl.That's right, folks. Flaming red with baby blue accents was the idea of my almost 2 year old son, not me.
Anyhow, the elephant was pretty easy to figure out. The hardest part which wasn't really hard at all, was figuring out how to get the trunk to curve. It's all single crochet with increases and decreases worked in the round.This project went really fast and I had it completed in a couple of hours.
Then there's the duck...well, let's just say that it has a nickname now: The Devil Duck.

The nickname was created not just because of the color, although it does make the duck look a little bit devilish. No, the nickname came because it took me MANY hours and MANY stitches to figure out this pattern. I'm talking: Crochet a shape, look at shape, decide it's not right, rip the stitches, crochet, look, decide, rip, crochet, and on and on until the duck started to take a duck-like shape. The head was really easy, but the body was certainly not. <--UNDERSTATEMENT OF THE YEAR
Right before I figured it out, I looked from the pile of ripped out yarn to my husband and proclaimed, "This is the last time I'm going to try this. If it doesn't work, the boy is getting a duck head and that's it!"
So I tried one last idea. An idea that if it hadn't worked would have been hell to rip out (see the theme here?). And then, to my utter amazement, the duck's body started to take shape.
In the 2 days that it took me to make the duck, I spent about 8 hours on the dang thing. Sad considering that once the pattern was figured out it took me about an hour and a half to complete.
I can tell you this: I won't be making another duck anytime soon. And when I do, I'm using a pattern.
All that trouble and turmoil and I still managed to pump out 2 crocheted critters in a weekend.
And the best part is that my kids love the animals. To date, they have slept with them every single night. That right there makes all the duck frustration worth it.
As I always say: If I made this in my free time, then imagine what you could do in yours!
Sunday, March 7, 2010
Mushrooms, Mushrooms, Mushrooms!
I love mushrooms.
As a teen, I used to spend hours drawing/coloring mushrooms to hang on my wall. I'm not sure where it all started, but I love them.
So naturally, I decided it would be a fantastic idea to crochet one.
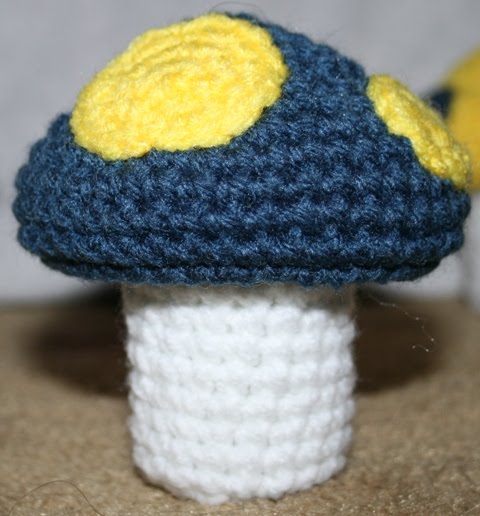
The first amigurumi pattern that I ever created was a mushroom. In fact, here is that first mushroom right after I made it:

I didn't have a pattern, the right sized crochet hook, or the typical mushroom colors (red and white), but I did it anyway. It measures about 4 inches tall by 2 1/2 inches wide or so. My kids love it.
The process went well, so I bought a smaller sized crochet hook and I made another mushroom. Then another. And another.
Since the creation of the first mushroom in the beginning of February, I've made tons more.
I perfected the pattern so that the mushroom will stand up on it's own and I've even reworked the mushroom pictured above with a smaller crochet hook.
Here are a few more of them:
I've given them away as gifts and I have even made a trade in which I got a really nice soy candle in exchange for a mushroom.
I've also made a mushroom trivet for my Grandma:
And some mushroom afghan squares for a blanket that I will make for myself *one day*:
The sky is the limit with mushrooms! I've made all of these projects in my free time since the second week in February.
If I can do this in a couple of hours a night here and there, then imagine what you can do!
As a teen, I used to spend hours drawing/coloring mushrooms to hang on my wall. I'm not sure where it all started, but I love them.
So naturally, I decided it would be a fantastic idea to crochet one.
The first amigurumi pattern that I ever created was a mushroom. In fact, here is that first mushroom right after I made it:

I didn't have a pattern, the right sized crochet hook, or the typical mushroom colors (red and white), but I did it anyway. It measures about 4 inches tall by 2 1/2 inches wide or so. My kids love it.
The process went well, so I bought a smaller sized crochet hook and I made another mushroom. Then another. And another.
Since the creation of the first mushroom in the beginning of February, I've made tons more.
I perfected the pattern so that the mushroom will stand up on it's own and I've even reworked the mushroom pictured above with a smaller crochet hook.
Here are a few more of them:
I've given them away as gifts and I have even made a trade in which I got a really nice soy candle in exchange for a mushroom.I've also made a mushroom trivet for my Grandma:
And some mushroom afghan squares for a blanket that I will make for myself *one day*:
The sky is the limit with mushrooms! I've made all of these projects in my free time since the second week in February.If I can do this in a couple of hours a night here and there, then imagine what you can do!
Monday, March 1, 2010
Ninja Heads
I like to crochet things that one doesn't always see patterns for.
For instance, I recently decided to crochet a ninja. And being the free spirit that I am, I decided to make my own pattern for it.
So I set off with some black yarn and a G (4.25 mm) sized crochet hook. In about 15 minutes I had created the head of the ninja and started on the bandanna. A few more minutes and I had created this ninja head:


Ninja-like, right? I thought so, too...at first.
As I tend to do, I soon started picking the pattern apart. Small changes to make it better, the curse of a perfectionist is in the details. I could spend hours ripping stitches for perfection.
The biggest change that I wanted to make was to add an actual face patch. As it is above, the ninja is very cartoonish and the placement of the eyes is a big factor. I think that the pattern would work well as a Teenage Mutant Ninja Turtle, but for an actual ninja's head? I just don't think it worked.
So with my modifications in mind, I set out to create the new ninja and I'm quite proud of the result:

A full view of the crocheted ninja head awesomeness:

Remember Spy vs. Spy from Mad magazine? This is my ninja head rendition--crochet style. Strung together on braided yarn for my husband. Now he can stop complaining that I never make him anything.
He's going to hang them on the rearview mirror in his car. Crocheting for guys is always tough. I'm quite proud that he deems them good enough to put on display.
Just think, I made this in my free time. Imagine what you could do!
And now I'm off to do some yoga. Good night all!

Yes, little phantom ninja head, I will find something for you to do, too. Coming soon...
For instance, I recently decided to crochet a ninja. And being the free spirit that I am, I decided to make my own pattern for it.
So I set off with some black yarn and a G (4.25 mm) sized crochet hook. In about 15 minutes I had created the head of the ninja and started on the bandanna. A few more minutes and I had created this ninja head:


Ninja-like, right? I thought so, too...at first.
As I tend to do, I soon started picking the pattern apart. Small changes to make it better, the curse of a perfectionist is in the details. I could spend hours ripping stitches for perfection.
The biggest change that I wanted to make was to add an actual face patch. As it is above, the ninja is very cartoonish and the placement of the eyes is a big factor. I think that the pattern would work well as a Teenage Mutant Ninja Turtle, but for an actual ninja's head? I just don't think it worked.
So with my modifications in mind, I set out to create the new ninja and I'm quite proud of the result:
A full view of the crocheted ninja head awesomeness:
Remember Spy vs. Spy from Mad magazine? This is my ninja head rendition--crochet style. Strung together on braided yarn for my husband. Now he can stop complaining that I never make him anything.
He's going to hang them on the rearview mirror in his car. Crocheting for guys is always tough. I'm quite proud that he deems them good enough to put on display.
Just think, I made this in my free time. Imagine what you could do!
And now I'm off to do some yoga. Good night all!

Yes, little phantom ninja head, I will find something for you to do, too. Coming soon...
Subscribe to:
Posts (Atom)